Technical FAQ
Technical FAQ
This almost always indicates one of the four (4) possible servos is having trouble. As you might expect, the most likely item that will cause a problem will be one of the servos (the only moving mechanical part in DryFire). Their movement is controlled by a continuous stream of data being sent to the servos through the USB cable. The composition of the data stream causes the servos to rotate clockwise, counter clockwise, or remain stationary. In almost all cases, if the trajectory on the wall is doing something you know is not correct the associated servo or servos are malfunctioning.
A little tip: Servos can go bad in lots of different ways, from just plain "dead" to a small jerk at just the wrong place in the trajectory. Or maybe the servo is moving too slowly when it is cold or hasn't been used for a period of time.
When you see these deviations from normal you should begin to suspect one of the servos.
A little history: Since this product was first produced in 2000, I have never seen a bad trajectory that didn't turn out to be a bad servo.
Are they repairable? No, but they are replaceable.
Can they be oiled or greased? No, it will only make a mess.
Are there other possible causes? Yes, let's explore some of them.
Could it be the USB cable?
No, because if the USB cable is bad or you have made it too long (in excess of 16 feet without an active component buster), it will simply stop working and there will be no trajectory; not just a jerk or the wrong speed trajectory.
Could it be the internal PC board?
Not likely as a bad component on the PC board will bring the whole system to a halt.
Could it be the firmware or the software?
No, if it were either of these, you wouldn't have a trajectory.
My advice: If the wiggle, giggle, jerk, or mis-direction of the trajectory is bad enough that you do not want to continue practicing, then, on a piece of paper, record the following information:
1) Left or right head as you view the DryFire unit from behind.
2) Name of the layout.
3) Target name inside the target window.
4) Distance or time down the trajectory.
5) On paper make a sketch of the trajectory.
6) Your guess as to whether it is a vertical or horizontal problem.
6) And any other details you are observing that could be important.
7) Your name, address, phone number and email address.
8) How long you have had the DryFire system.
When you return your unit for repair, include the above information on a piece of paper and place it in the shipping container.
Why is this important? Because before we can fix the problem, we will need to duplicate what you are seeing.
Since DryFire was first shipped in the year 2000, some new customers have called to say, "my gun won't shoot."
Based upon personally speaking to several hundred of these customers, over many years, let me give you a path to determine your problem.
First, you need a little knowledge regarding how the DryFire system deals with every shot. When the target is launched, the camera, mounted right next to the visible laser is turned on and is responsible to let the system software know when it sees invisible infrared light in the circular area around the visible target laser. The camera also provides the size of the infrared spot on the wall by passing onto the software the actual number of camera pixels it saw.
Note: Your gun laser is highly focused and produces a spot which occupies between 8 and 12 camera pixels.
If the number of pixels is less than 20, DryFire processes the location of the infrared spot believing the spot was created by your gun laser.
However, if the number of pixels seen by the camera is 20 or greater DryFire ignores that anything has happened. In other words, if the number of pixels is 20 or above the assumption is made that the infrared couldn't have come from your gun and therefore going through the normal process would be wrong.
Therefore, as you consider your problem be aware that "my gun won't shoot" is very likely being caused by (1) unwanted infrared on your shooting wall, which has created a spot size of 20 or more camera pixels.
However, (2) it could be that your gun assembly is not delivering a pulse of infrared light to your shooting wall. Either of these scenarios could be the problem.
So, the first thing you need to do is determine which of the above conditions is the problem.
The best approach is to wait until after nightfall, go into your DryFire room, leave all the lights off, except for your computer screen. Close all the doors in the room and begin shooting.
If the gun shoots every time you pull the trigger, then you have proved you have an infrared lighting issue. Once you have proved to yourself you have a infrared lighting issue you will be able to fix the problem.
Look for the following:
1) Outside light has a large component of infrared which you can't see because your eyes can't see the infrared wavelength. But, it is there. So, make sure you block out all possible sources of outside light. Also, most indoor light sources produce some infrared. Fluorescent and LED light sources produce the least.
2) Do not have a light in front of the DryFire unit. When the DryFire camera looks directly at a light of any type, it will see enough infrared to cause a problem.
3) It is possible to have "hotspots" or regions on your wall that have to much infrared. This is usually caused by spotlights.
4) Do not have windows, doors, or lights behind your background canvas as the camera will see infrared through the canvas.
If during the troubleshooting process you proved the room was not the problem, then continue on to the next topic.
"Troubleshooting my Gun Assembly"
Check the following:
1) Check the Trigger Switch - with the Trigger Switch plugged into the Trigger Box, press and release the Trigger Switch while watching the red LED on the bottom of the Trigger Box. If the LED flashes, the Trigger Switch is GOOD. If the LED doesn't flash, unplug the Trigger Switch from the Trigger Box.
Next, use a little screwdriver and short the two (2) recessed pins in the Trigger Box together while watching the red LED. Don't worry when you do this, you can't hurt yourself or the Trigger Box. If the red LED flashes, the Trigger Switch is BAD. If it doesn't flash, the Trigger Box is BAD.
2) Check the Trigger Box - if step 1 above proved your Trigger Box was bad, then the only thing you can do is replace the batteries. Slide the top cover off to expose the batteries. Take note that the large flat side of the batteries is touching the spring. The batteries can be ordered from the DryFire web site or you can purchase them locally. If you try to purchase them locally, you are looking for an Energizer 357 or equivalent. You will likely need to go to a battery specialty shop to find these batteries.
After replacing the batteries, plug the Trigger Switch into the Trigger Box and again press and release the switch. If the red LED flashes, the batteries were BAD. If the red LED doesn't flash, the Trigger Box is BAD and you can order a replacement from the DryFire US web site.
3) Check the Muzzle Laser Insert - if you press and release the Trigger Switch and the Red LED does flash, then the next step is to see if the Muzzle Laser Insert produces a laser light. This is a little strange, because this laser produces an infrared light which is invisible to the human eye. However, in the right environment, you can see a slight flash of reddish light.
In a dark room, with the laser insert about 1/2 inch from a piece of white paper, you will be able to see a slight flash of reddish light each time you press and release the trigger. So, plug the Trigger Switch and Muzzle Laser Insert into the Red Trigger Box. Take a piece of paper and this Gun Assembly into a dark room and try it.
If you don't see any flashes, you have one of two possible problems.
(1) The the Trigger Box could be BAD, or (2) the Muzzle Laser Insert could be BAD. So, I would suggest you call the DryFire toll free number (1-877-357-1485) and order both replacement parts. Explain to the DryFire person the trouble you are having and let them know that you will be returning, for credit, one of the two pieces. Once you have the two replacement parts in your hand it will be easy to figure out which piece is GOOD and which piece is BAD.
Trigger boxes supplied from March 1st, 2002 onwards are capable of acting as a "pull" trigger (shot fired when switch pressed) or "release" trigger (shot fired when switch is released.)
Checking Which Mode the Trigger Is In
There is a small RED light (referred to as an LED) which protrudes through the plastic on the bottom side of the trigger box. Watch this LED as you press the trigger switch. If the LED flashes when the switch is pressed the trigger box is in the "pull" trigger mode. If the LED flashes when the switch is released the trigger box is in the "release" trigger mode.
Selecting Release Trigger Mode
The trigger box is supplied to the customer in the "pull" trigger mode, but can be converted into the "release" trigger mode by holding the trigger switch down for approximately ten (10) seconds. You know you have held the switch down long enough when the LED turns RED and remains on. To prove you have made the conversion, press the trigger switch while watching the RED LED (it should NOT blink). Then release the trigger switch and watch to make sure it does blink.
Returning to Pull Trigger Mode
To convert back to the "pull" trigger mode it will be necessary to remove the batteries from the trigger box. But, before you remove the batteries, take note of the direction they are currently installed in the trigger box (the big flat side touching the spring). With the batteries removed and the trigger switch connected to the trigger box, depress and hold the trigger switch down while you slowly count to 30. Now, re-insert the batteries.
Existing DryFire users can purchase replacement parts at the DryFire Store.
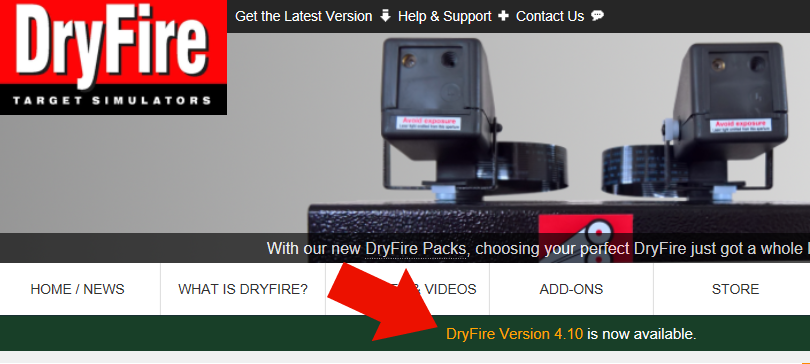
In order to make sure that all our customers have access to the official world-wide version, we direct you to the UK DryFire website's homepage.
When you arrive at their home page (shown below) look for the "yellow" letters in the middle of the green horizontal bar, which says, "DryFire Version 4.10" and click on it to begin the download.
When you arrive at their home page (shown below) look for the "yellow" letters in the middle of the green horizontal bar, which says, "DryFire Version 4.10" and click on it to begin the download.